MIRTEC, the ‘Global Leader in Inspection Technology’, is proud to announce its participation in the productronica 2025. The premier event for the electronics manufacturing industry will be held from November 18-21, 2025, at the Messe München GmbH. Visitors can find MIRTEC at Booth #461, where the company will showcase its full lineup of advanced 3D AOI and SPI inspection systems.
MIRTEC’s flagship Anti-Reflection Technology (ART) 3D AOI System is the world’s first 95MP Multi-Camera / Full HD Projection inspection platform. Equipped with five high resolution cameras and four Full HD digital projectors, the system delivers unprecedented accuracy for inspecting highly reflective objects such as solder joints—an area where conventional AOI systems have long struggled.
The breakthrough lies in ART’s innovative optical architecture. Conventional AOI solutions often rely on algorithms to fill in data lost due to specular reflections or blind spots caused by component structures. ART resolves these limitations by capturing 3D data from multiple directions, ensuring that solder joints are inspected entirely on the basis of actual measured data. Even when reflections or blind spots prevent the top-down camera from capturing accurate results, ART’s side cameras seamlessly fill in the gaps, enabling comprehensive inspection without compromise.
MIRTEC’s GENESYS-CC for conformal coating inspection AOI is configured with a high resolution camera, lens, and 10 phase coaxial color lighting system that includes three stages of UV lights. This allows the GENESYS-CC to provide more accurate and faster inspection compared to others. It also stands out from competing conformal coating inspection systems with three distinctive optical features. First, GENESYS-CC provides an option to overcome the challenges of bubble detection. By selecting the high-resolution 4㎛lens, it is possible to detect bubbles as small as 60㎛with exceptional precision. This advanced optional optical system ensures flawless bubble detection with unparalleled inspection accuracy. Second, the system incorporates three UV-enabled lighting stages, enabling compatibility with a wide variety of coating materials like acrylic, silicon and, etc. The last distinctive feature is the side camera for lateral coating inspection. The inclusion of a side camera allows for through inspection of side-coated areas, enhancing the overall inspection capabilities. In addition to these standout features, MIRTEC’s GENESYS-CC is capable of measuring coating thickness of most acrylic and silicon coating materials. Furthermore, the optional flipper conveyor applied inside the machine allows double-sided PCB inspection without the need of an external flipper.
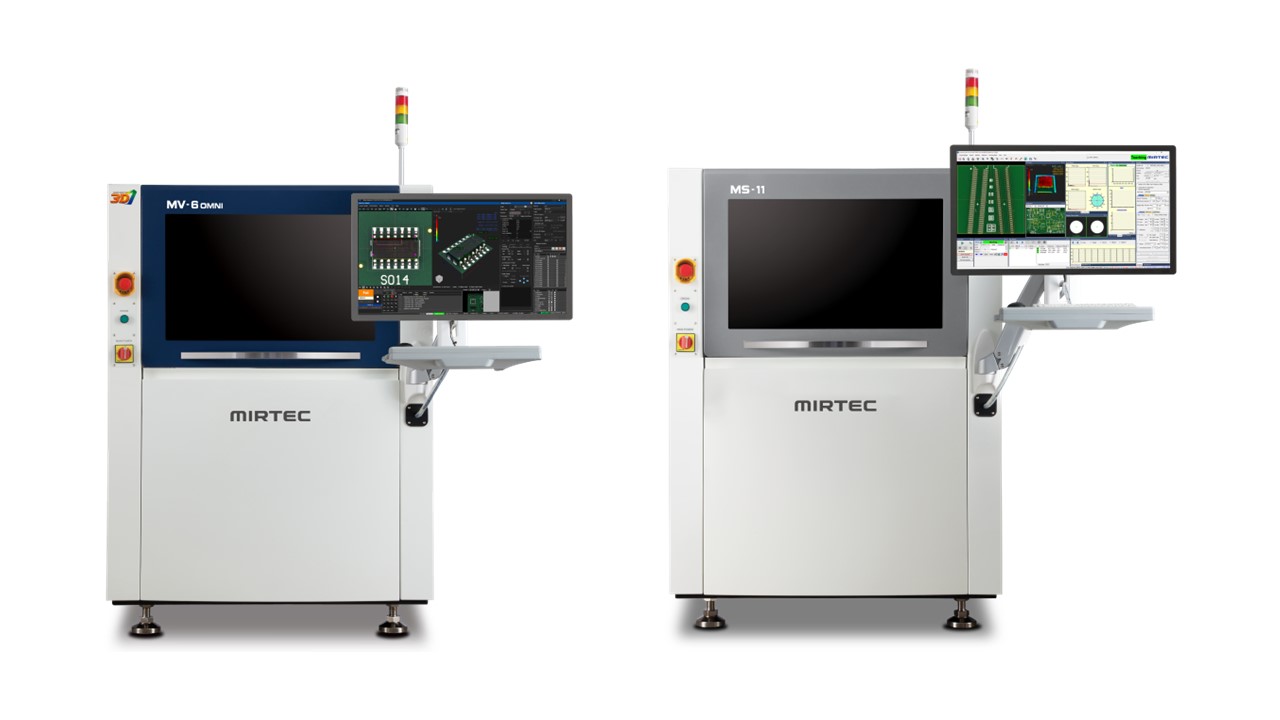
MIRTEC will also display award-winning MV-6 OMNI 3D AOI System. It is configured with a 15MP High-Resolution CoaXPress main camera combined with an 18MP side camera, and MIRTEC’s exclusive 3D Digital Blue Moiré Projection Technology. Also, the MV-6 OMNI can support precise 3D inspection of parts up to 40㎜ in height by moving the Z-axis. Finally, the optional flipper conveyor applied inside the machine allows double-sided PCB inspection without the need of an external flipper.
MV-6 OMNI 3D AOI System will be configured with a specialized 3D laser scanner attachment, TAL 3D SCAN, the pre-inspection system before MV-6 OMNI. The TAL 3D SCAN can inspect up to 70㎜ parts in 3D, which is the tallest height range measurement on the market. Furthermore, this is possible without the need of Z-axis movement unlike the other 3D AOIs, where there is no slow-down of the inspection time. The TAL 3D SCAN does not interfere with inspection speed in any way. According to the in-house test results and calculation from MIRTEC, this innovative system promises about 30% improvement in productivity for THT-SMT mixed PC inspection. (※This number can increase further as there are taller component percentages within the PCB)
MIRTEC’s improved MV-3 OMNI Benchtop 3D AOI System is configured with the same hardware and software as MIRTEC’s in-line OMNI-VISION® 3D Inspection Systems providing 100% compatibility across MIRTEC’s entire 3D AOI product line. These systems feature our exclusive OMNI-VISION® 3D Inspection Technology which combines 15 MP CoaXPress Camera Technology with MIRTEC’s revolutionary Digital Tri-Frequency Moiré 3D system in a cost effective platform. MIRTEC’s 15 MP CoaXPress Vision System is a proprietary camera system designed and manufactured by MIRTEC for use with our complete product range of 3D inspection systems. MIRTEC’s Twelve (12) projection Digital Tri-Frequency Moiré Technology provides true 3D inspection to yield precise height measurement data used to detect lifted part and lifted lead defects as well as solder volume post reflow.
Upgraded MV-3 OMNI is capable of inspecting high and low-height parts mixed PCBs by expanding to top clearance of 70㎜ and bottom clearance of 100㎜. Improved inspection capability of bottom clearance allows inspection of tall parts. Also, this will bring customer satisfaction in both the automotive electronics industry and the defense industry. Furthermore, the safety features of upgraded MV-3 OMNI designed for the user convenience and safety have been strengthened even though they were already safe. Without a doubt, the MV-3 OMNI is the most Technologically Advanced Benchtop 3D AOI system in the world!
MIRTEC’s MS-11 3D SPI System features our exclusive 15MP or 25MP CoaXPress camera technology, providing enhanced image quality, superior accuracy, and incredibly fast inspection rates. The MS-11 3D SPI is also available with 4MP Camera Link option. It use dual projection shadow-free moiré phase shift imaging technology to inspect solder paste depositions on PCBs post screen print for insufficient/excessive solder, shape deformity, a shift of deposition, and bridging. All MIRTEC’s 3D SPI systems are IPC CFX compliant and feature upstream and downstream Closed-loop feedback. The new ‘Quick Tracker’ function is made available by connecting MIRTEC’s 3D SPI to its 3D AOI system. This function allows users to check SPI inspection results with 3D images from linked AOI’s GUI.
MIRTEC’s Award-Winning MV-9SIP Hybrid 3D Inspection System features our exclusive Hybrid System in Package (SiP) Inspection Technology which combines MIRTEC’s 3D Digital Blue Moiré Projection Technology with a High-Resolution Blue Laser Scanner. It’s proprietary 25MP CoaXPress vision system is designed and manufactured by MIRTEC for precise inspection of semiconductor post-process. With the combination of a 25MP 7.7㎛ ultra-high camera and the blue light digital moiré projectors, the MV-9SIP finds defects among densely bonded, micro-sized parts such as 01005 size chip array. The Blue Laser Scanner applied to MV-9SIP was developed to measure objects that have surfaces with extreme optical properties such as high reflectiveness or very low reflectiveness. The core idea of this system is to use different inspection methodologies for each item that has different characteristics in a single platform. Lately, the MV-9SIP is not only used to inspect SiP parts, but also solder ball and bump inspection. Since the trend for these inspection items became important recently due to the rise of semiconductor packaging industry.
MIRTEC’s Smart Factory Automation solution, ‘INTELLI-PRO AI’, is an AI based Software Suite specifically designed for the purpose of improving the performance and convenience of MIRTEC’s complete line of AOI machines. The INTELLI-PRO AI consists of a proprietary Deep Learning based Automatic Part Search and Teaching function, and AI based; Automatic Parameter Optimization, Character Recognition (OCR), Foreign Object Detection (FOD), Placement Inspection Algorithms and an Automatic Defect Type Classification function. The post-inspection stage is a process in which inspection results are reviewed and classified. When the AOI finds a defect, the PCB will be sent to an NG buffer. Upon review, an operator will be able to judge if the defect is real or a false call. Deep Learning Auto Defect Classification Tool, one of MIRTEC’s considerations for customers, can change that. This software will ‘suggest’ to the user whether the defect on a NG PCB is a real defect or a false call. However, as the software accumulates inspection data, the software will learn to identify real issues versus false calls. The predictions will become more accurate over time. Eventually, after approximately six months of learning, the software can then ‘judge’ the defect rather than ‘suggest’ to the user.
MIRTEC’s ongoing commitment to innovation has positioned the company as a trusted supplier of advanced inspection solutions for the electronics manufacturing industry. With a focus on high-tech sectors such as automotive, aerospace, and defense, MIRTEC continues to push the boundaries of the inspection technology.
Join MIRTEC at Booth #461 at the productronica 2025 to experience why the company is recognized as one of the most dynamic and forward-thinking providers of inspection systems in the industry.
To learn more, visit www.mirtec.com.


